
PL
Funkcje
SPD Prędkościomierz
ODO Drogomierz, przebieg całkowity
DST Drogomierz, przebieg cząstkowy (aktualnej trasy)
MXS Najwyższa prędkość (osiągnięta maksymalna prędkość)
AVS Średnia prędkość
TM Czas wycieczki (zbiorczy)
CLK Zegar, format czasu 12- lub 24-godzinny
SCAN Automatyczna zmiana wyświetlanych danych
+/- Wskaźnik rosnącej/malejącej średniej prędkości
- Przypomnienie oserwisie
- Zmiana wyświetlanych jednostek zkilometrów na mile
- Ustawianie obwodu kół (0–9999mm)
- Ustawianie drogomierza
- Zapis wartości chwilowej
- Automatyczne przechodzenie wstan czuwania
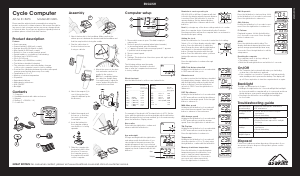
Wkładanie baterii
Zdejmij pokrywę komory baterii iwłóż baterię do licznika rowerowego. UWAGA! Biegun dodatni baterii (+)
powinien być skierowany wgórę. Załóż pokrywę komory baterii idokręć ją.
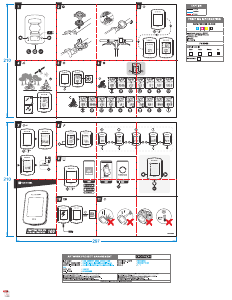
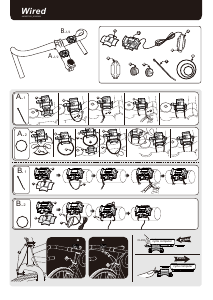
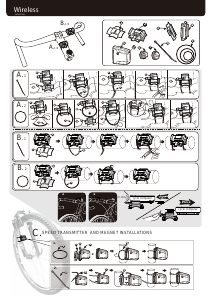
Montaż czujnika imagnesu
Zamontuj czujnik na jednym zramion przedniego widelca,
amagnes na szprysze po tej samej stronie koła co czujnik.
Przed ostatecznym zamocowaniem opaską położenie
czujnika na ramieniu przedniego widelca można regulować
podkładką. Patrz rysunek poniżej. Ustaw magnes względem
położenia czujnika. Płaska powierzchnia magnesu powinna
być skierowana w stronę czujnika, a odległość pomiędzy
magnesem a czujnikiem wynosić 1 mm. Magnesu nie
należy montować tak, by przechodził przez środek czujnika.
Magnes współpracuje zczujnikiem najlepiej, jeśli przechodzi
blisko górnej lub dolnej krawędzi czujnika.
Montaż uchwytu licznika
Wtorebce zakcesoriami znajduje się opaska do zamocowania licznika na kierownicy. Wrazie potrzeby
można użyć podkładki.
Montaż przewodu sygnałowego
Poprowadź przewód wzdłuż ramienia przedniego widelca idokładnie zamocuj go opaską, tak aby nie
zaplątał się wszprychy, drążki kierownicy ani inne elementy.
Mocowanie izdejmowanie licznika
Wsuń licznik wblokadę uchwytu, aż usłyszysz kliknięcie. Aby zdjąć
licznik, naciśnij lekko blokadę uchwytu iwyciągnij licznik wkierunku
przeciwnym niż podczas mocowania.
Kontrola iewentualna zmiana ustawień: wprowadź koło wruch
isprawdź na wyświetlaczu licznika, czy odbiera on sygnał
igeneruje wartości. Jeśli sygnału nie ma lub jest nieregularny,
należy ponownie ustawić położenie czujnika imagnesu.
Wybór obwodu koła
Po włożeniu baterii do licznika na wyświetlaczu widoczna będzie migająca liczba
2060. Cyfry zmienia się, naciskając wielokrotnie prawy przycisk. Gdy cyfra na
wyświetlaczu będzie zgodna zobwodem kół wrowerze (patrz tabela poniżej), naciśnij
lewy przycisk, aby potwierdzić ustawienie iprzejść do kolejnej cyfry. Ustaw wszystkie
cztery cyfry po kolei, od prawej do lewej. Zakres ustawień to od 0–9999mm. Po
zakończeniu wprowadzania obwodu kół naciśnij ponownie lewy przycisk, aby przejść
do wyboru jednostki długości: kilometrów lub mil.
Rozmiar opony Obwód Rozmiar opony Obwód
700 C x 38 2180 26'' x 2,1'' 2068
700 C x 35 2168 26'' x 2,0'' 2114
700 C x 28 2136 26'' x 1,95'' 2050
700 C x 23 2096 26'' x 1,75'' 2023
700 C x 20 2086 26'' x 1,6'' 2051
650 C x 20 1938 26'' x 1,5'' 2026
29'' x 2,3'' 2326 26'' x 1,0'' 1913
29'' x 2,1'' 2288 24'' x 1,75'' 1890
28'' x 1,75'' 2268 20'' x 1,95'' 1565
28'' x 1,5'' 2224 20'' x 1,5'' 1490
27,5'' x 2,0'' 2155 20'' x 1,25'' 1450
27'' x 1 1/8'' 2174 18'' x 1,5'' 1340
27'' x 1 1/4'' 2135 16'' x 2,0'' 1245
26'' x 2,25'' 2115 14'' x 1,75'' 1055
Wybór jednostki długości (km/mi)
Naciśnij prawy przycisk, aby zmienić wyświetlane jednostki z kilometrów ikm/h na mile
imi/h. Aby przejść do ustawienia przypomnienia oserwisie, ponownie naciśnij lewy przycisk.
Ustawianie przypomnienia oserwisie
Standardowe ustawienie zakłada przypomnienie oserwisie po 200km lub milach.
Aby wybrać częstotliwość serwisowania (dostępne okresy to 200, 400, 600 lub
800km lub mil), naciskaj prawy przycisk. Aby zatwierdzić wybór, naciśnij lewy przycisk.
Gdy przebieg całkowity osiągnie zaprogramowaną wartość, na wyświetlaczu zacznie
migać ikona śrubokrętu. Aby zresetować alarm i usunąć wskaźnik zwyświetlacza,
przytrzymaj przycisk wciśnięty przez 3 sekundy.
Ustawianie zegara zwyborem formatu 12- lub 24-godzinnego
Przejdź do trybu zegara iprzytrzymaj lewy przycisk wciśnięty przez 3sekundy,
aby zmienić format godziny. Naciśnij lewy przycisk, aby wybrać format 12- lub
24-godzinny. Aby zatwierdzić wybór, naciśnij prawy przycisk. Gdy cyfra godziny
zacznie migać, możesz wprowadzić prawidłową wartość, naciskając lewy przycisk.
Aby zatwierdzić ustawienie, naciśnij prawy przycisk. Powtórz czynność, aby ustawić
właściwą wartość minut. Aby przejść do ustawiania drogomierza, naciśnij prawy przycisk.
1. Licznik rowerowy
2. Czujnik
3. Magnes
1
2
3
Wył. Wł.
Ustawianie drogomierza (przebieg całkowity)
Drogomierz ma zakres od 0,00 do 9999,99 km lub mil. Drogomierz zeruje się
automatycznie po osiągnięciu maksymalnej wartości. Przejdź do trybu ODO
iprzytrzymaj lewy przycisk wciśnięty przez 3sekundy, aby zmienić wartość przebiegu.
Standardowe ustawienie to 0000,00. Aby zmienić wartość przebiegu, naciśnij prawy
przycisk. Aby zatwierdzić każdą zmianę, naciśnij lewy przycisk. Funkcja ta umożliwia
przywrócenie prawidłowej wartości przebiegu całkowitego po wymianie baterii. Aby
przejść do trybu DST (przebieg cząstkowy), naciśnij prawy przycisk.
DST
Czas wycieczki jest dostępny wtrybie TM. Funkcja DST to drogomierz ozakresie od 0,01
do 9999,99km lub mil. Wartość drogomierza zeruje się automatycznie po osiągnięciu
maksymalnej wartości. Przejdź do trybu DST iprzytrzymaj lewy przycisk wciśnięty przez
3sekundy, aby wyzerować zapisany dystans wycieczki. Jednocześnie wyzerowana zostanie
wartość wtrybie MXS, AVS iTM. Aby przejść do trybu MXS, naciśnij prawy przycisk.
MXS
Funkcja MXS zapisuje największą osiągniętą prędkość od ostatniego zerowania
drogomierza. Przejdź do trybu MXS i przytrzymaj lewy przycisk wciśnięty przez
3 sekundy, aby zmienić zapisaną największą prędkość. Jednocześnie wyzerowana
zostanie wartość wtrybie DST, AVS iTM.
Aby przejść do trybu AVS, naciśnij prawy przycisk.
AVS
Funkcja AVS oblicza izapisuje średnią prędkość od ostatniego zerowania drogomierza.
Przejdź do trybu AVS i przytrzymaj lewy przycisk wciśnięty przez 3 sekundy, aby
wyzerować zapisaną średnią prędkość. Jednocześnie wyzerowana zostanie wartość
wtrybie DST, MXS iTM. Aby przejść do trybu TM, naciśnij prawy przycisk.
TM
Funkcja TM to licznik czasu wycieczki (od ostatniego zerowania drogomierza). Zakres
pomiaru to od 0:00:00 do 99:59:59. Czas wycieczki zeruje się automatycznie po
osiągnięciu maksymalnej wartości. Jednocześnie wyzerowana zostanie wartość
wtrybie DST, MXS iAVS. Przejdź do trybu TM iprzytrzymaj lewy przycisk wciśnięty przez
3sekundy, aby wyzerować zapisany czas wycieczki. Jednocześnie wyzerowana zostanie
wartość wtrybie DST, MXS iAVS. Aby przejść do trybu SCAN, naciśnij prawy przycisk.
SCAN
Wtym trybie na wyświetlaczu będą się pojawiać kolejno wartości dla DST, MXS, AVS
iTM. Zmiana następuje automatycznie. Aby wyłączyć tryb SCAN iwyświetlić zegar,
naciśnij prawy przycisk.
AUTOMATYCZNE PRZECHODZENIE WSTAN CZUWANIA
Po 300 sekundach braku sygnału wyświetlacz przechodzi automatycznie w stan
czuwania i wyświetlana jest jedynie aktualna godzina. Licznik automatycznie
powróci do normalnego trybu pracy po otrzymaniu sygnału z czujnika lub po
naciśnięciu dowolnego przycisku.
PRĘDKOŚCIOMIERZ
Jeśli licznik nie jest wtrybie czuwania, przez cały czas mierzy prędkość iwyświetla bieżącą wartość. Prędkość jest
wyświetlana zdokładnością do 0,1km/h lub mi/h, azakres pomiaru wynosi od 0,0 do 99,9km/h lub mi/h.
+/-Wskaźnik rosnącej/malejącej średniej prędkości
Tendencja zmiany średniej prędkości jest wyświetlana w postaci znaku + lub -
w prawym górnym rogu wyświetlacza. Znak + oznacza, że aktualna prędkość
jest wyższa niż średnia prędkość, czyli średnia prędkość rośnie. Znak - oznacza, że
aktualna prędkość jest niższa niż średnia prędkość, czyli średnia prędkość maleje.
Zapis wartości chwilowej
Istnieje możliwość zapisania wartości chwilowej przez naciśnięcie wdowolnym trybie lewego przycisku. Na
wyświetlaczu widoczny będzie wówczas czas wycieczki (TM) wmomencie zapisu wartości chwilowej. Możesz
przeglądać wszystkie zapisane wartości chwilowe (DST – TM – AVS – MXS), naciskając wielokrotnie prawy
przycisk. Naciśnij ponownie lewy przycisk, aby wyłączyć tryb zapisu wartości chwilowej.
Przywracanie ustawień fabrycznych
Aby przywrócić ustawienia fabryczne, naciśnij jednocześnie prawy ilewy przycisk iprzytrzymaj je przez 3sekundy.
Zastosowanie przycisków
Prawy przycisk służy do wyboru funkcji: ODO, DST, MXS, AVS, TM, SCAN izegara. Lewy przycisk służy tylko
do zapisywania wartości chwilowej. Po zapisaniu wartości chwilowej lewym przyciskiem można przeglądać
inne zapisane wartości chwilowe, naciskając prawy przycisk. Naciśnij ponownie lewy przycisk, aby wyłączyć
tryb zapisu wartości chwilowej ipowrócić do standardowego wyświetlania.
Problem Przyczyna/rozwiązanie
Prędkościomierz stale pokazuje 0. Magnes iczujnik są nieprawidłowo położone
względem siebie.
Wyświetlane wartości są nieprawidłowe. Nieprawidłowe ustawienie parametrów, np.
obwód kół.
Powolna reakcja. Temperatura otoczenia jest niższa niż 0°C.
Dane na wyświetlaczu są niewyraźne lub
nieczytelne.
Nie pozostawiaj licznika narażonego na
bezpośrednie działanie promieni słonecznych
wzamkniętym pomieszczeniu, np. przy oknie.
Połóż licznik wcieniu.
Wyświetlacz jest wyłączony. Bateria jest włożona nieprawidłowo (brak styku)
lub rozładowana. Włóż baterię prawidłowo lub
wymień ją na nową.
Na wyświetlaczu nie pokazują się żadne
symbole.
Wyjmij baterię iodczekaj 10sekund. Włóż baterię
zpowrotem.
Data produkcji: 2016-04-05
© Jula AB.
Dbaj o środowisko!
Nie wyrzucaj zuytego produktu wraz z odpadami komunalnymi! Produkt zawiera elektryczne
komponenty mogące być zagroeniem dla środowiska i dla zdrowia. Produkt naley oddać
do odpowiedniego punktu składowania lub przynieść go do jednego ze sklepów gdzie przy
zakupie nowego sprzętu bezpłatnie przyjmiemy stary tego samego rodzaju i w tej samej ilości.
PL – Instrukcja obsługi (Tłumaczenie oryginalnej instrukcji). Z zastrzeżeniem prawa do zmian. W razie
ewentualnych problemów skontaktuj się telefonicznie z naszym działem obsługi klienta pod numerem:
22 338 88 88. www.jula.pl
Distributör/ Distributør/ Dystrybutor/ Distributor
Jula Poland Sp. z o.o., ul. Malborska 49, 03-286 Warszawa, Polska
EN
Functions
SPD Speedometer
ODO Odometer, total distance
DST Odometer, trip distance
MXS Top speed memory (maximum speed)
AVS Average speed memory
TM Trip clock (accumulated trip time)
CLK Clock, selection of 12 or 24 hour display
SCAN Automatic switching between display modes
+/- Indicating of increased/reduced average speed
- Maintenance alarm
- Distance and speed measuring can be reset to kilometres or miles
- Adjustable wheel circumference (0-9999 mm)
- Adjustable odometer
- Freezing of instantaneous values
- Automatic standby
Inserting the battery
Remove the battery cover and insert the battery in the bike computer. NOTE: The battery’s positive
terminal (+) must point upwards. Replace the battery cover and twist in place.
Fitting the sensor and magnet
Fit the sensor on one of front forks on the bike and t
the magnet on one of the spokes on the same side of
the wheel as the sensor. The position of the sensor in
relation to the front fork can be adjusted with spacers
before it is secured with the cable tie. See diagram below.
Adjust the relative position of the sensor and magnet.
The smooth surface should face the sensor and the gap
between the magnet and sensor should be 1 mm. Do not
t the magnet so that it passes the centre of the sensor.
Detection works best if the magnet passes near the top or
bottom edge of the sensor.
Fitting the bracket for the computer
There is a cable tie in the box of accessories to fasten the bracket for the computer on the handlebars.
Spacers can be used if necessary.
Fitting the signal cable
Fit the cable securely along the front fork with cable ties to prevent it from getting caught in the spokes,
the controls on the handlebars, or some other object.
Fastening and removing the computer
Push the computer into the slot on the bracket until it clicks in place.
To remove the computer, gently press the catch on the bracket and
pull the computer out.
Checking and adjusting: Rotate the front wheel and check the
display to see that the computer receives a signal and gives a
reading. If there is no signal, or the signal is erratic, this means the
position of the sensor and the magnet needs adjusting.
Setting the circumference of the wheel
When the battery is inserted the display will show 2060, and one of the digits will
ash. The ashing digit can be set by repeatedly pressing the button on the right.
When the digit corresponds with the correct circumference of the wheel on your bike
(see table below), press the button on the left to conrm the setting and switch to
the next digit. Set all the 4 digits one by one from right to left. The settings run from
0 to 9999 mm. When the circumference is set, press once again on the button on the
left to set kilometres or miles.
Tyre size Circumference Tyre size Circumference
700 C x 38 2180 26'' x 2.1'' 2068
700 C x 35 2168 26'' x 2.0'' 2114
700 C x 28 2136 26'' x 1.95'' 2050
700 C x 23 2096 26'' x 1.75'' 2023
700 C x 20 2086 26'' x 1.6'' 2051
650 C x 20 1938 26'' x 1.5'' 2026
29'' x 2.3'' 2326 26'' x 1.0'' 1913
29'' x 2.1'' 2288 24'' x 1.75'' 1890
28'' x 1.75'' 2268 20'' x 1.95'' 1565
28'' x 1.5'' 2224 20'' x 1.5'' 1490
27.5 x 2.0 2155 20'' x 1.25'' 1450
27'' x 1 1/8'' 2174 18'' x 1.5'' 1340
27'' x 1 1/4'' 2135 16'' x 2.0'' 1245
26'' x 2.25'' 2115 14'' x 1.75'' 1055
Setting kilometres/miles
Press the button on the right to switch between measuring and displaying in km
and km/h, or miles and mph. Press the button on the left to switch to setting the
maintenance alarm.
Setting the maintenance alarm
The standard setting is 200 km or miles. Press the button on the right to select
the maintenance interval: 200, 400, 600 or 800 km or miles. Press the button on
the left to conrm the setting. When the distance driven reaches the set value a
spanner starts ashing on the display Press the button on the right for 3 seconds to
acknowledge the alarm and switch o the symbol.
Setting the clock with 12 or 24 hour display
Go to clock mode and press the button on the left for 3 seconds to switch to 12/24
hour display. Press the button on the left to select 12 or 24 hour display. Press the
button on the right to conrm the display mode. When hour display starts ashing,
set the correct hour by pressing the button on the left. Press the button on the right
to conrm the setting. Repeat to to set the correct minutes. Press the button on the
right to switch to setting of the odometer.
1. Bike computer
2. Sensor
3. Magnet
1
2
3
O On
Setting the trip meter
The trip meter runs from 0.00 to 9999.99 km or miles. The trip meter resets
automatically when the distance driven reaches the maximum value on the
odometer. Go to ODO mode and press the button on the left for 3 seconds to switch
to setting the odometer. The standard setting is 0000.00. Press the button on the
right to set the odometer digits. Press the button on the left to conrm each setting.
This setting makes it possible to reset the correct odometer setting after changing
the battery. Press the button on the right to switch to trip meter mode DST.
DST
The trip clock is under TM. The DST function is a trip meter with a measuring interval of
0.01 to 9999.99 km or miles. The trip meter resets automatically when the trip distance
reaches the maximum value on the trip meter. Go to DST mode and press the button on
the left for 3 seconds to reset the stored DST trip distance. The values in the functions MXS,
AVS and TM are reset at the same time. Press the button on the right to switch to mode.
MXS
The MXS function is a top speed memory that stores the top speed reached after the
last reset of the trip meter. Go to MXS mode and press the button on the left for 3
seconds to reset the top speed stored in MXS. The values in the functions DST, AVS
and TM are reset at the same time.
Press the button on the right to switch to AVS mode.
AVS
The AVS function calculates and stores the average speed since the last reset of the
trip meter. Go to AVS mode and press the button on the left for 3 seconds to reset the
average speed stored in AVS. The values in the functions DST, MXS and TM are reset
at the same time. Press the button on the right to switch to TM mode.
TM
The TM function is a trip clock that measures and shows the total driving time since
the last reset of the trip meter. The measuring interval is 0:00:00 to 99:59:59. The
trip clock resets automatically when the trip time reaches the maximum value on
the trip clock. The values in the functions DST, MXS and AVS are reset at the same
time. Go to TM mode and press the button on the left for 3 seconds to reset the trip
time stored in TM. The values in the functions DST, MXS and AVS are reset at the
same time. Press the button on the right to switch to SCAN mode.
SCAN
In this mode the display switches automatically so that DST, MXS, AVS and TM are shown
one by one. Press the button on the right to switch o SCAN mode and switch to clock mode.
AUTOMATIC STANDBY
After 300 seconds without an input signal the display automatically goes into
standby mode and only the clock function is shown. The bike computer automatically
resets to normal when an input signal is received or a button is pressed.
SPEEDOMETER
The speedometer is always enabled when the bike computer is not in standby mode, and shows the actual
speed in the display. The resolution is 0.1 km/h or mph and the measuring interval is 0.0 to 99.9 km/h
or mph.
+ / – Indicating of increased/reduced average speed
The average speed trend is shown with the characters + and – in the top right corner
on the display. + means that the actual speed is higher than the average speed,
which means that the speed is increasing. – means that the actual speed is less than
the average speed, which means that the average speed is decreasing.
Freezing of instantaneous values
It is possible to freeze instantaneous values by pressing the button on the left in any function mode. The trip
time (TM) is shown on the display instantaneously. Browse through all the instantaneous values (DST – TM –
AVS – MXS) by pressing the button on the right repeatedly. Press the button on the left once to stop freezing.
Reset of default settings
Press the buttons on the left and right at the same time for 3 seconds to reset all settings to default.
Using both buttons
Use the button on the right to select function: ODO, DST, MXS, AVS, TM, SCAN and clock. The button on
the left is only used to freeze instantaneous values. The button on the right is used to browse through
the instantaneous values obtained with the button on the left. Press the button on the left again to stop
freezing and return to normal mode.
Problem Reason/action
The speedometer shows 0 all the time. The magnet and sensor have the wrong relative
positions.
The values shown are incorrect. Incorrect parameter setting, e.g. incorrect wheel
circumference.
Slow reaction. The ambient temperature is lower than 0°C.
The display is blurred or illegible. Do not expose the bike computer to direct sunlight
in a closed environment, e.g. inside a window. Put
it in the shade.
The display is o. The battery is not correctly inserted (bad
connection) or is discharged. Insert the battery
correctly, or replace.
No symbols are shown on the display. Remove the battery and wait for 10 seconds.
Replace the battery.
Date of production: 2016-04-05
© Jula AB
Care for the environment!
Must not be discarded with household waste! This product contains electrical or electronic
components that should be recycled. Leave the product for recycling at the designated station
e.g. the local authority's recycling station.
EN - Operating instructions (Translation of the original instructions). Jula reserves the right to make
changes. In the event of problems, please contact our service department.
www.jula.com


Bli med i samtalen om dette produktet
Her kan du dele hva du synes om Kayoba 639-452 Sykkelcomputer. Hvis du har et spørsmål, les først bruksanvisningen nøye. Be om en bruksanvisning kan gjøres ved å bruke vårt kontaktskjema.
svar | Det var nyttig (0) (Oversatt av Google)