
ENGLISH
GREAT BRITAIN • CUSTOMER SERVICE tel: 020 8247 9300 e-mail: customerservice@clasohlson.co.uk
internet: www.clasohlson.co.uk postal: 10 – 13 Market Place, Kingston Upon Thames, Surrey, KT1 1JZ
A
B
1
2
5
3
6
4
7
8
9
10
Ver. 20170331
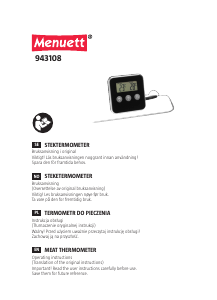
Meat Thermometer
Art.no 44-2238 Model TPW306
Please read theentire instruction manual before using theproduct and then save it for future
reference. We reserve theright for any errors in text or images and any necessary changes
made to technical data. In theevent of technical problems or other queries, please contact our
Customer Services.
Safety
• Theproduct is only intended for normal domestic use and only in themanner described in
this instruction manual.
• Do not expose theproduct to rain or moisture.
• Theproduct’s temperature probe is only designed for measuring theinternal temperature of
foodstuffs. Never attempt to use theproduct for other types of temperature measurement.
• Never mix old and new batteries. Never mix rechargeable and non-rechargeable batteries.
• Do not subject theproduct to impacts or shocks.
• Theproduct should never be used if it is in any way damaged or malfunctioning.
• Never immerse theproduct into water or other liquids. Wipe theproduct dry immediately if it
has become wet or damp.
• Never let children play with theproduct.
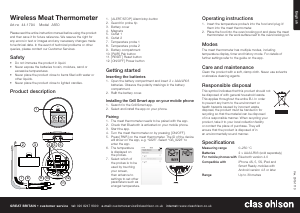
Product description
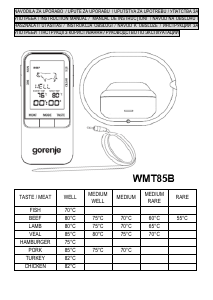
Thetable below shows pre-set temperatures for different types of meat:
Meat type Displays Well done Medium Medium rare Rare
Beef BEEF
75 °C/167 °F 70 °C/158 °F 60 °C/140 °F 55 °C/131 °F
Veal VEAL
75 °C/167 °F 70 °C/158 °F
- -
Lamb LAMB
75 °C/167 °F 70 °C/158 °F
- -
Pork PORK
77 °C/171 °F 71 °C/160 °F
- -
Chicken CHICK
80 °C/176 °F
- - -
Turkey TURKY
80 °C/176 °F
- - -
Fish FISH
60 °C/140 °F
- - -
Hamburger HAMBG
75 °C/167 °F
- - -
Select cooking temperature
1. Well done, Medium, Medium rare or Rare do not appear on screen.
2. If any one of these doneness levels appear on screen, hold in [ MODE ] until
theselection disappears.
3. Press or hold in [ Meat ▲ ] or [ Taste ▼ ] to set thedesired temperature.
Timer function
Press [ MODE ] until thetimer appears on screen. Thetimer has two modes, timer and stopwatch.
Note: You can start thetimer and then select any of thepre-set cooking temperatures
mentioned above. Thetimer will then run in thebackground without showing up on screen.
You can interrupt thetimer at any time by pressing the [ Mode ] button.
Timer
1. Press [ Minute ] to set theminutes and [ Hour ] to set thehours.
2. Press [ ►/■ ] to start thetimer.
3. When theset time is reached anaudible signal will be emitted.
Press any button to turn thealarm off.
4. Thetimer will continue counting down even after thealarm has been turned off.
To turn thetimer off press [ ►/■ ].
5. Hold in [ ►/■ ] to reset.
Stopwatch
1. Press [ ►/■ ] to start thestopwatch.
2. Press [ ►/■ ] to stop thestopwatch.
3. Hold in [ ►/■ ] to reset.
Care and maintenance
• Clean theexterior of thethermometer by wiping it with adamp cloth.
Use only mild cleaning agents, never solvents or corrosive chemicals.
• Whenever thethermometer is not to be used for anextended period, thebatteries
should be removed and stored in adry, dust-free environment, out of children’s reach.
Note:
Theprobe must never be put into adishwasher or washed in running water. It must only be cleaned by
wiping it with adamp cloth. Be careful not to get any water inside thecable connection of theprobe. If
water gets inside theprobe it might damage it and cause inaccurate temperature readings.
Troubleshooting guide
Thethermometer won’t
turn on/thedisplay is unclear.
Check that thebatteries are not flat and that they are
inserted correctly. Change if necessary.
Thetemperature displayed
is incorrect.
• Check that thetemperature probe is properly plugged into
thethermometer.
• Check thebatteries and replace if necessary.
• Make sure that theprobe is properly positioned into
themeat.
Thedisplay shows “LLL”
or “HHH”.
Thetemperature range (0–300 °C/32–572 °F) has been
exceeded or is below range. Allow theprobe to return to room
temperature before attempting to use it again.
Responsible disposal
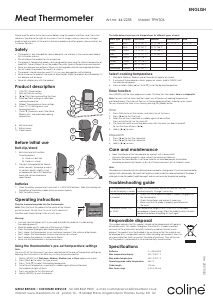
1. [ ON/OFF ] Power button
2. [ Minute ] Minutes setting
3. [ ►/■ ] Start/stop and resetting thetimer
4. [ Meat ▲ ] Meat settings or selectable
cooking temperature
5. [ Mode ] Thermometer or timer settings
6. [ Hour °C/°F ] Setting hours and
temperature units
7. [ Taste ▼ ] Doneness levels (Well Done,
Medium etc.) and selectable cooking
temperature
8. Belt clip/stand
9. Battery cover
10. Probe socket
Before initial use
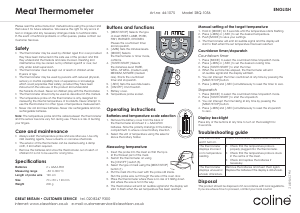
Belt clip/stand
1. Belt clip/stand with multiple
fastening options.
A) Used as abelt clip
B) Used as astand
2. Theclip is fastened onto thethermo-
meter securely. To remove or adjust
its position, bend it slightly using
anappropriate tool until it becomes
loose and can be removed or
repositioned.
Batteries
1. Open thebattery compartment and insert 2×AAA/LR03 batteries. Note themarkings on
thebottom of thebattery holder to ensure correct polarity.
2. Refit thebattery cover.
Operating instructions
Plug thetemperature probe into thethermometer.
Note: Stick thetip of theprobe into thecentre of thethickest
part of themeat. Do not stick it in so far that it comes out
theother end. Avoid sticking it into any fatty areas.
Warning:
• Use heat-resistant gloves/mitts if you need to handle theprobe or its cable during
thecooking process.
• Keep theprobe and its cable out of thereach of children.
• Clean theprobe thoroughly both before and after use.
• Don’t subject thethermometer to rain and never immerse it into water or other liquids.
• Don’t subject thethermometer to excessive heat or hot surfaces.
• Don’t expose theprobe or its cable to live flames.
• Never use thethermometer in microwave ovens.
Using the thermometer’s pre-set temperature settings
Note:
You can still set thetimer even if you have selected one of thepre-set temperature settings by
following theinstructions in theSelecting cooking temperaturesection.
1. Hold in [ MODE ] until Well done, Medium, Medium rare or Rare appears on screen.
2. Press [ Meat ▲ ] to select thetype of meat.
3. Press [ Taste ▼ ] to select thecooking temperature.
4. Once theset temperature is reached anaudible signal will be emitted and
thetemperature light will flash.
5. Press any button to turn thealarm off.
6. Hold in [ MODE ] to reset thedisplay.
This symbol indicates that this product should not be disposed of with general
household waste. This applies throughout theentire EU. In order to prevent
any harm to theenvironment or health hazards caused by incorrect waste
disposal, theproduct must be handed in for recycling so that thematerial can
be disposed of in aresponsible manner. When recycling your product, take it to
your local collection facility or contact theplace of purchase. They will ensure
that theproduct is disposed of in anenvironmentally sound manner.
Specifications
Batteries 2×AAA/LR03
Max temperature display 300 °C/572 °F
Max probe temperature 300 °C/572 °F
Operating probe cable temperature 380 °C
Cable length 105 cm
Max timer range 0–23 h 59 min


Bli med i samtalen om dette produktet
Her kan du dele hva du synes om Coline TPW306 Kjøkkentermometer. Hvis du har et spørsmål, les først bruksanvisningen nøye. Be om en bruksanvisning kan gjøres ved å bruke vårt kontaktskjema.
svar | Det var nyttig (2) (Oversatt av Google)
svar | Det var nyttig (0) (Oversatt av Google)