BWM401
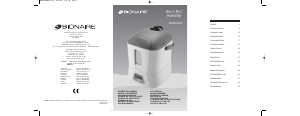
Fig.1
A
F
H
G
D
B
E
C
J
L
K
M
N
Fig.2
E
I
A
PLEASE READ AND SAVE THESE
IMPORTANT INSTRUCTIONS.
NOTE: Before reading these instructions,
please unfold the back page for the
corresponding illustrations
DESCRIPTION
Fig.1
A. Lid
B. Medication cup
C. Moisture Outlet
D. Handle
E. Water Tank
F. Air Inlet (Not Shown)
G. Control Panel
H. Base
I. Misting Chamber
Fig.2
J. Display Lens
K. Humidity Set Button
L. Mode/Off Button
M. Refill Light
N. Power Light
HOW YOUR WARM MIST HUMIDIFIER
WORKS
Your Bionaire
®
Warm Mist Humidifier is designed
to allow the proper amount of water to flow out
of the tank and into the Heating Chamber where
the Electronic Thermal Control Heating Element
warms the water. Air is drawn in through the grill
openings located in the back of the unit and
mixed with steam in the misting chamber. The
warm mist is then dispersed out of the top of the
misting chamber through the outlet grill and into
the room.
NOTE: A humidity level below 20% can be
unhealthy and uncomfortable. The recommended
humidity level is between 40%-50%.
PRE-OPERATING INSTRUCTIONS(SEE
FIGS.1 - 2)
1. Be sure the Humidifier is switched to OFF
and the unit is disconnected from the
electrical outlet.
2. Select a location for your Humidifier, on a flat
surface, about 10cm (4") away from the wall.
DO NOT place the Humidifier on a finished
floor on or near furniture which can be
damaged by moisture or water. Place on a
moisture-resistant surface.
Filling the Water Tank
NOTE: This humidifier holds about 4.2 litres of
water in the tank and humidifier base. The
humidifier will produce up to 11 litres of moisture
over a 24-hour period, depending on the room
humidity and temperature.
1. If not already removed, remove the Tank
from the base of the Humidifier and take it to
the cold water tap. Turn the Tank upside
down and twist off the Tank Cap by turning
counter clockwise. Fill Tank with cool, fresh
tap water. DO NOT fill with warm water as
this may cause leaking. Replace the Cap on
the Tank FIRMLY but do not overtighten.
2. When full, carry Tank to the Humidifier and
place onto the Base. The water will
immediately begin to flow into Base.
3. Please wait for five minutes for water
chamber to fill with water from water tank.
4. Plug the power cord into a convenient 220/
240V AC electrical outlet.
OPERATING INSTRUCTIONS (SEE
FIGS.1 - 2)
Your Humidifier is equipped with a
technologically advanced AccuSet™ Digital
Humidistat. You can set the Humidifier to run
continuously in manual mode or set the
AccuSet™ Digital Humidistat to your desired
humidity setting. The AccuSet™ Digital
Humidistat will automatically turn the humidifier
ON or OFF, depending on the preset comfort
level. The comfort level ranges from 35% to 65%
relative humidity.
MANUAL MODE
NOTE: After starting the unit from cold, it will
take 5–10 minutes before any noticeable steam
is emitted from the Outlet Grill.
1. When plugged in, the Display will show the
current room humidity.
2. To start the unit, press the MODE/OFF
Button for the HIGH (HI) manual setting.
3. Press the Button again for the LOW (LO)
manual setting.
4. To stop the unit, keep pressing the Button
until the Display reads OFF (OF).
ACCUSET™ HUMIDISTAT MODE
To take advantage of the AccuSet™ Digital
Humidistat:
1. Press the MODE/OFF button until you reach
AU (Automatic) Accuset.
ENGLISH
2. Adjust the set humidity by using the Humidity
Set Button. The Display will show a setting in
the range 35% – 65% and the humidity can
be increased/decreased in increments of
5%. When the room humidity level rises
above the set humidity, the Humidifier will
stop. When the humidity level drops below
the set humidity, the Humidifier will turn on
automatically.
NOTE: The AccuSet™ Humidifier has memory.
This means that when you turn the unit back on
to AccuSet™ mode, it will remain at the setting
the Humidifier was previously set at, unless the
unit has been unplugged.
REFILL PROCEDURE
NOTE: When the Water Tank is empty and the
water in the Heating Chamber is almost empty,
the Red REFILL light will illuminate, the panel
will display "FILL" and the Automatic Shut Off
will activate.
The unit will not operate again until you refill the
Water Tank and reset the Humidifier as follows.
1. Remove and refill the Water Tank, being sure
to follow the Maintenance Instructions.
Replace the Tank onto the Base.
2. After 5 minutes, turn the unit on. The REFILL
light should now be off (if not repeat steps 1
through to 2)). In about 5 minutes, the
Humidifier will begin to produce moisture.
3. If you do not plan to use the Humidifier for
two or more days, make sure any residual
water is drained from the Water Tank and
Base to prevent algae or bacteria growth.
AUTO SAFETY SHUT OFF
This humidifier is equipped with a
technologically advanced, safety system that
requires the user to reset the humidifier if there
is a potential overheat situation. When a
potential overheat temperature is reached, the
system will automatically shut the humidifier off.
It can only resume operation when the user
resets the unit.
To reset the humidifier
1. Unplug unit, wait 15 minutes.
2. Press the reset button on the bottom
of the unit.
CLEANING AND MAINTENANCE
INSTRUCTION
The following maintenance procedures
must be routinely followed in order to
ensure proper, efficient operation of your
humidifier. The unit WILL FAIL if it is not
cleaned properly.
Regular cleaning prevents scale build-up on the
heating element and tray. It also prevents
microorganisms from growing on the tray and
tank. This ensures that maximum efficiency will
be achieved. We cannot over-emphasize how
essential proper cleaning is to the maintenance
and continued use of your unit and the
avoidance of algae or bacteria build-up.
Regular Maintenance
1. Be sure the unit is OFF and is disconnected
from the electrical outlet.
2. Remove the Water Tank.
3. Empty water and minerals from the Base.
4. Drain the water from the Tank into the sink
and rinse tank thoroughly. Leave to dry.
5. Wipe the Heating Element clean with a soft
cloth after it has had a chance to cool. The
Electronic Thermal Control Heating Element
is lined with a non stick coating that is
designed to provide the easiest cleaning and
prolong the operating efficiency of the
Humidifier. DO NOT use any metal or hard
objects to clean the Heating Element
6. Re-place the tank and lid onto the base.
7. Follow Operating Instructions.
NOTE: Never use detergents, gasoline,
kerosene, glass cleaner, furniture polish,
paint thinner or and other household solvent
to clean any part of the Humidifier.
De-scaling Maintenance
Scale needs to be removed as it becomes
noticeable. We recommend using Bionaire
®
.
Clean Away - Humidifier cleaning solution. Apply
Solution with a plastic brush to scale surfaces.
Let it soak until residue is softened. For cleaning
the tank, mix 2 capsules of solution with 2 litres
of water. Let mixture stand for several minutes,
swishing every few minutes. Drain solution and
THOROUGHLY RINSE the tank.
1. Repeat steps 1-3 in the Maintenance section.
2. Clean the water chamber in the base by
adding 200ml of undiluted white vinegar,
then use a soft cloth to clean this part. If the
element is heavily scaled, add the vinegar as
explained above and plug the humidifier into
an electrical socket and turn it ON for no
longer than 15 seconds. After this time turn
the humidifier OFF and unplug it from the
electrical outlet.
Disinfect tank:
1. Fill tank with 1 teaspoon of bleach and 3.5
litres of water.
2. Let the solution stand for 20 minutes, shaking
every few minutes. Wet all surfaces.
2
3


Bli med i samtalen om dette produktet
Her kan du dele hva du synes om Bionaire BWM401 Luftfukter. Hvis du har et spørsmål, les først bruksanvisningen nøye. Be om en bruksanvisning kan gjøres ved å bruke vårt kontaktskjema.